
I’ll be honest with you: for the longest time, my bathroom sink looked like a graveyard for half-used serums, crusty toothpaste tubes, and stray hair ties. I kept buying those cute little wicker baskets thinking they’d save me, but all they did was hide the mess while the bottom of the baskets got moldy from the constant splashes. I realized the hard way that a “tidy” bathroom isn’t about hiding things; it’s about intelligent accessibility.
Guru Tip: If you’ve already cleared your counter but still feel cramped, you might be ignoring your walls. Once you’re done here, check out our guide on reclaiming vertical space in the shower and wall zone to complete your transformation.
Many people approach bathroom clutter by buying more generic plastic bins, thinking that more “stuff to hold stuff” will solve the problem. In reality, you usually end up with a drawer full of mismatched containers and even less counter space than you started with. The mistake isn’t a lack of storage; it’s a lack of a system that respects how small, humid, and busy the average vanity area actually is.
In 2026, we are moving away from the “stuff it in a drawer” mentality and toward functional zoning. If you’re tired of knocking over your moisturizer just to reach your floss, this guide is for you. We are focusing specifically on the “Active Zone”—the high-traffic square footage around your sink where your morning and evening routines actually happen.
A Quick Note from SmartDeal Finds
At SmartDeal Finds, we specialize in hunting down the most practical, high-value home solutions that actually work in real-world spaces. We don’t just look for what’s “trending”—we look for durability, ease of installation, and true value for your money. Every product mentioned here has been vetted for its ability to solve a specific “pain point” in your daily routine.
Amazon Affiliate Disclosure
As an Amazon Associate, I earn from qualifying purchases. This means that if you click on one of the product links and make a purchase, I may receive a small commission at no extra cost to you. This helps support our research at SmartDeal Finds so we can keep bringing you honest, helpful guides.
BUYING FACTORS: THE TECHNICAL SPECS
Before you go on an Amazon spree, you need to look at the “boring” details. I’ve made the mistake of buying “pretty” organizers that failed within a month because I didn’t check the material specs. Here is what matters in 2026:
1. Material Integrity (ABS vs. Standard Plastic)
In a bathroom, “plastic” is a broad term. You want High-Grade ABS (Acrylonitrile Butadiene Styrene) or Crystal Clear Acrylic.
- Why? Standard cheap plastics (like PP or PE) are porous. They absorb smells and yellow when exposed to sunlight or bathroom cleaners. ABS is non-porous, impact-resistant, and maintains its “glass-like” clarity for years.
2. The Rotation Radius & Footprint
Don’t just measure the width of your counter. For rotating items, you need to measure the Rotation Radius.
- The Math: If a caddy is 10 inches wide, you need at least 12 inches of clear space. Why? Because as it spins, the corners of square bottles or the “swing” of the unit shouldn’t hit your faucet or the backsplash.
3. Load-Bearing Ball Bearings
If you are buying a turntable, look at the base. Cheap ones use plastic sliders; high-quality ones use Stainless Steel Ball Bearings.
- Pro Tip: Stainless steel bearings won’t seize up or squeak when they get hit by the inevitable bathroom steam.
4. The “U-Pipe” Geometry
Under-sink storage is where most buyers fail. You aren’t just measuring a box; you are measuring around a P-trap or U-pipe.
- Measurement: Measure the distance from the cabinet floor to the lowest curve of the pipe. Your organizer must either sit beside it or be an “L-shaped” unit designed to hug the plumbing.
TOP 4 SINK & VANITY RECOMMENDATIONS
1. The 360° Rotating Acrylic Skincare Caddy
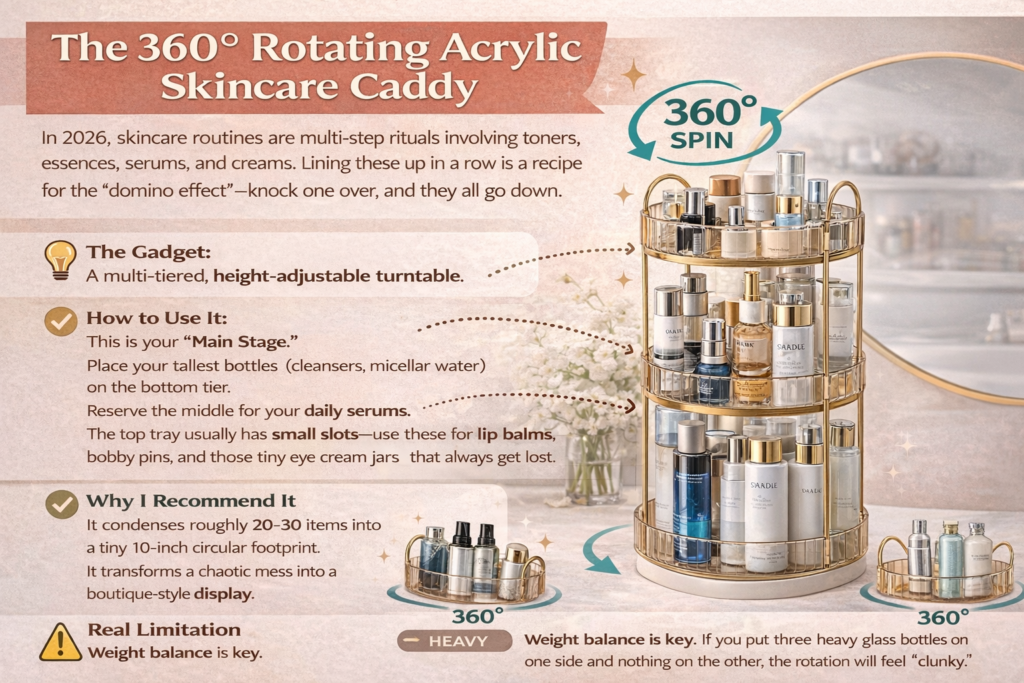
In 2026, skincare routines are multi-step rituals involving toners, essences, serums, and creams. Lining these up in a row is a recipe for the “domino effect”—knock one over, and they all go down.
- The Gadget: A multi-tiered, height-adjustable turntable.
- How to Use It: This is your “Main Stage.” Place your tallest bottles (cleansers, micellar water) on the bottom tier. Reserve the middle for your daily serums. The top tray usually has small slots—use these for lip balms, bobby pins, and those tiny eye cream jars that always get lost.
- Why I Recommend It: It condenses roughly 20–30 items into a tiny 10-inch circular footprint. It transforms a chaotic mess into a boutique-style display.
- Best for: Skincare enthusiasts and shared vanity counters.
- Real Limitation: Weight balance is key. If you put three heavy glass bottles on one side and nothing on the other, the rotation will feel “clunky.” Keep the weight distributed.
2. Magnetic Inverted Toothbrush & Dispenser Station
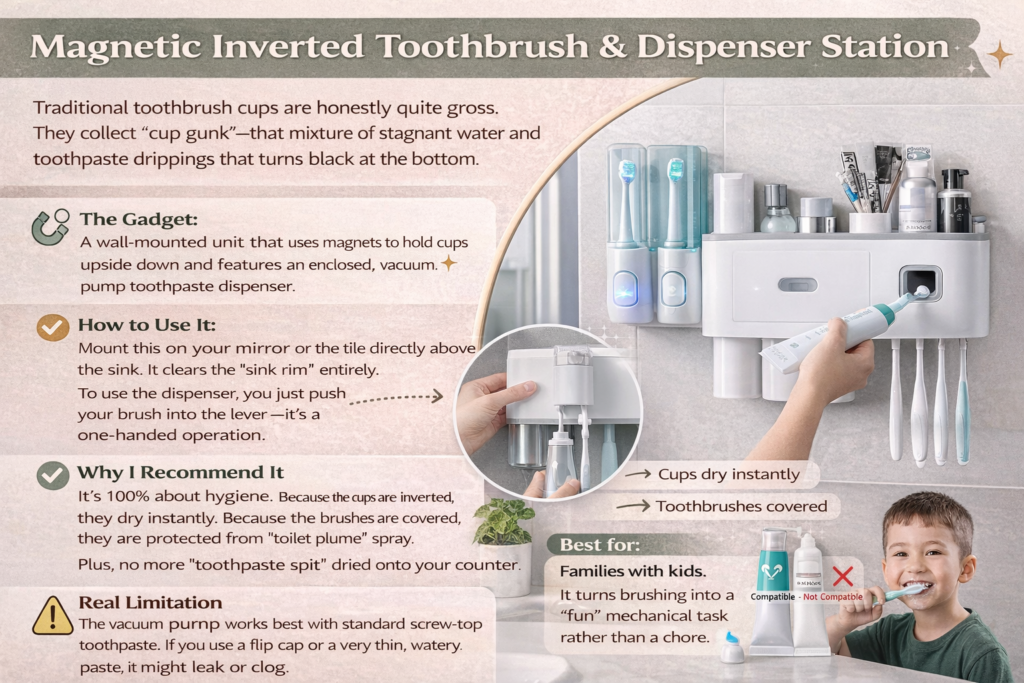
Traditional toothbrush cups are honestly quite gross. They collect “cup gunk”—that mixture of stagnant water and toothpaste drippings that turns black at the bottom.
- The Gadget: A wall-mounted unit that uses magnets to hold cups upside down and features an enclosed, vacuum-pump toothpaste dispenser.
- How to Use It: Mount this on your mirror or the tile directly above the sink. It clears the “sink rim” entirely. To use the dispenser, you just push your brush into the lever—it’s a one-handed operation.
- Why I Recommend It: It’s 100% about hygiene. Because the cups are inverted, they dry instantly. Because the brushes are covered, they are protected from “toilet plume” spray. Plus, no more “toothpaste spit” dried onto your counter.
- Best for: Families with kids. It turns brushing into a “fun” mechanical task rather than a chore.
- Real Limitation: The vacuum pump works best with standard screw-top toothpaste. If you use a flip-cap or a very thin, watery paste, it might leak or clog.
3. “L-Shaped” Under-Sink Sliding Drawers
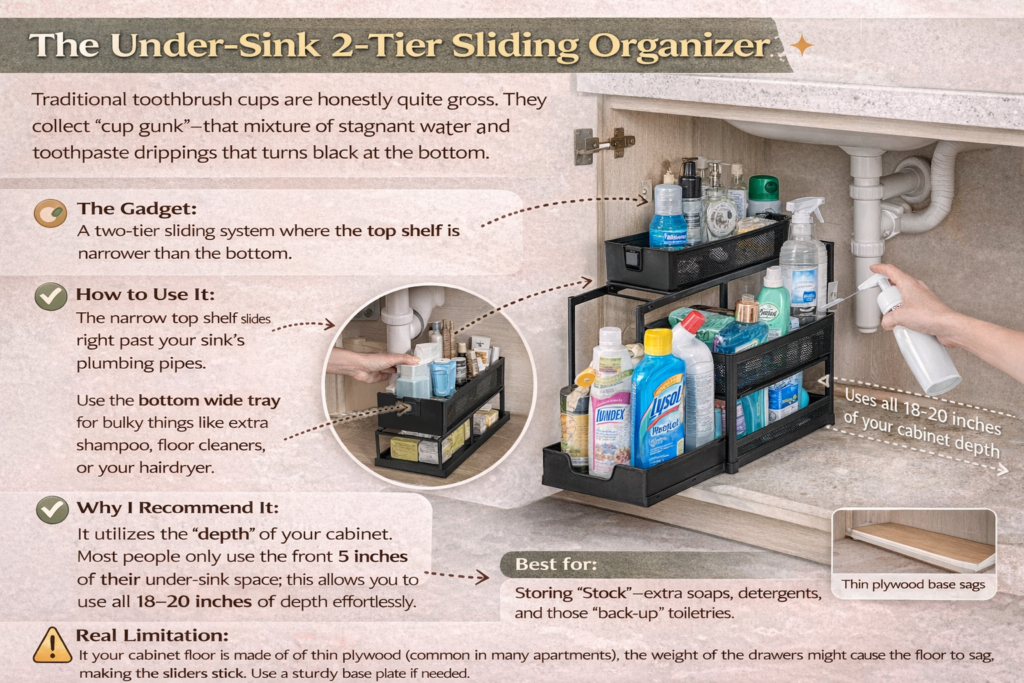
The area under the sink is usually where cleaning supplies go to die. You can’t see what’s in the back, so you keep buying more.
- The Gadget: A two-tier sliding system where the top shelf is narrower than the bottom.
- How to Use It: The narrow top shelf slides right past your sink’s plumbing pipes. Use the bottom wide tray for bulky things like extra shampoo, floor cleaners, or your hairdryer.
- Why I Recommend It: It utilizes the “depth” of your cabinet. Most people only use the front 5 inches of their under-sink space; this allows you to use all 18–20 inches of depth effortlessly.
- Best for: Storing “Stock”—extra soaps, detergents, and those “back-up” toiletries.
- Real Limitation: If your cabinet floor is made of thin plywood (common in many apartments), the weight of the drawers might cause the floor to sag, making the sliders stick. Use a sturdy base plate if needed.
4. Slim Rolling “Gap” Trolley
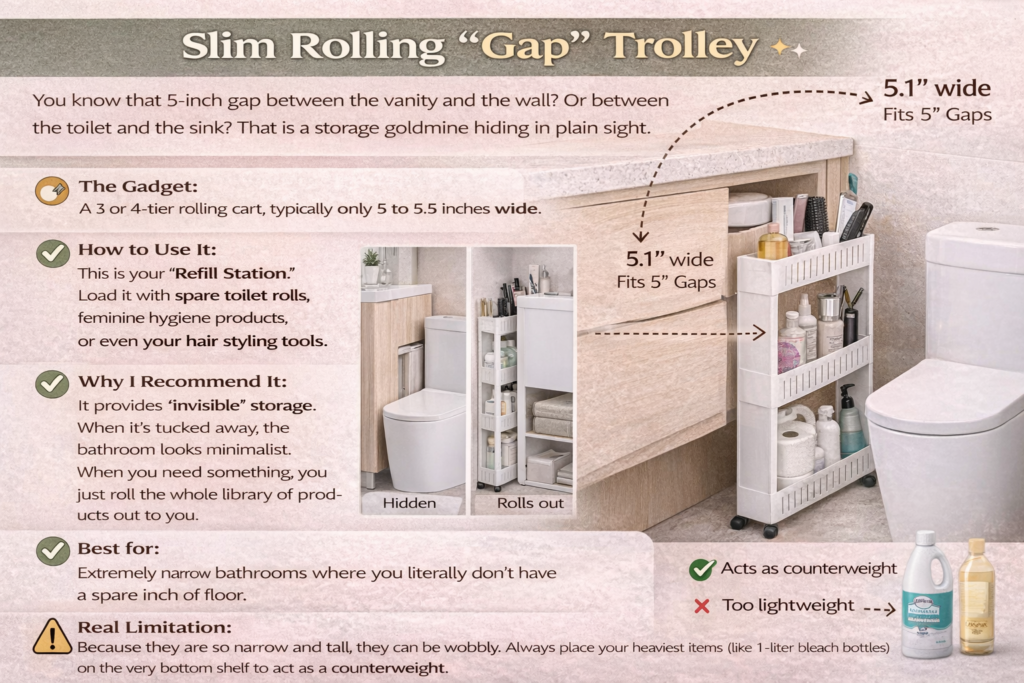
You know that 5-inch gap between the vanity and the wall? Or between the toilet and the sink? That is a storage goldmine hiding in plain sight.
- The Gadget: A 3 or 4-tier rolling cart, typically only 5 to 5.5 inches wide.
- How to Use It: This is your “Refill Station.” Load it with spare toilet rolls, feminine hygiene products, or even your hair styling tools.
- Why I Recommend It: It provides “invisible” storage. When it’s tucked away, the bathroom looks minimalist. When you need something, you just roll the whole library of products out to you.
- Best for: Extremely narrow bathrooms where you literally don’t have a spare inch of floor.
- Real Limitation: Because they are so narrow and tall, they can be wobbly. Always place your heaviest items (like 1-liter bleach bottles) on the very bottom shelf to act as a counterweight.
THE SINK ZONE SHOPPING CHECKLIST
Before you hit “Checkout,” grab a measuring tape and verify these four things. I’ve seen so many people return items because they “thought it would fit.”
Counter Depth: Do you have 11 inches of flat surface from the backsplash to the edge of the sink? (For the Rotating Caddy).
Pipe Clearance: Is there at least 10 inches of height between the cabinet floor and the bottom of the sink’s U-pipe? (For Under-Sink Drawers).
The “Gap” Width: Is your gap at least 5.5 inches? Most “slim” carts are 5.1 inches wide; they need a tiny bit of wiggle room to roll smoothly.
Adhesive Prep: Do you have Rubbing Alcohol? You cannot stick a toothbrush holder or shelf onto a greasy or soapy tile. You must “strip” the surface with alcohol first for a permanent bond.
FAQ: VANITY & SINK
Q: How do I stop my rotating caddy from sliding on a wet marble counter? A: Marble is incredibly slippery when wet. If your caddy doesn’t come with rubber “feet,” I recommend buying a small pack of silicone “bumper dots.” Stick four of them to the base, and it won’t budge even if the counter is soaking wet.
Q: Will the toothbrush holder adhesive ruin my expensive mirrors? A: No. In 2026, most quality brands use Acrylic Nano-Tape. It creates a vacuum seal but doesn’t have “glue” that eats into the glass. To remove it, just use a hairdryer to warm it up for 60 seconds, and it will peel off like a rubber band.
Q: My under-sink area is always a bit damp. Should I avoid metal drawers? A: Absolutely. If you have any history of leaks or high humidity under the sink, avoid “chrome-plated” steel. Even the expensive ones eventually rust at the joints. Go for high-grade ABS plastic or powder-coated “Space Aluminum,” which is naturally rust-proof.
Q: Is the automatic toothpaste dispenser hygienic? A: Only if you clean it! The internal silicone “squeezer” needs to be popped out and rinsed under warm water once every two weeks. Otherwise, old toothpaste dries up and becomes a magnet for dust.
FINAL RECOMMENDATION
If you are overwhelmed and don’t know where to start, start with the Rotating Skincare Caddy. In my experience, 80% of bathroom “mess” is just too many small bottles living on a flat surface. By moving them into a vertical, rotating tower, you reclaim your counter, protect your products from water damage, and—most importantly—you stop knocking things over every single morning.
FINISH THE LOOK: RELATED GUIDES
Don’t let your organizing streak end here! Explore our other expert deep-dives to transform every corner of your home into a powerhouse of efficiency and style:
How to Design a Home Office at Home: A Complete Guide to Comfort, Productivity & Style – Learn how to move beyond just placing a desk in a corner. This guide helps you create a dedicated workspace that supports focus, health, and creativity through ergonomic furniture, smart storage, and personalized decor.
How to Design a Small Living Room that Feels Spacious, Stylish & Functional – Discover timeless tricks like the “power of white” to reflect light, the strategic use of mirrors to visually expand boundaries, and how to utilize vertical space with floor-to-ceiling curtains to make any room feel instantly larger.
Pingback: Roborock Q7 M5+ Robot Vacuum and Mop – Smart Hands-Free Cleaning for Modern Homes - SmartDeal Finds
Pingback: The Ultimate Guide to Home Organization: 5 Amazon Products That Actually Save Space - SmartDeal Finds