
When I first moved into my apartment in Germany, I remember feeling quite satisfied with the kitchen. It looked modern, compact, and well-designed — exactly what you would expect in most European homes.
At least, that’s what I thought initially.
However, within a few weeks of daily cooking, small inefficiencies started becoming very noticeable. Not big problems — just small, repeated frustrations.
For example, every time I started cooking:
- I had to walk back to grab spices
- My utensils were not where I instinctively reached
- The drawer felt full, yet I couldn’t find what I needed quickly
- Cabinets looked organized, but using them was inconvenient
At that point, I realized something important.
👉 The kitchen wasn’t poorly designed — the system inside it was.
And that’s where my engineering mindset kicked in.
Instead of rearranging randomly, I approached the kitchen like a system that needed optimization.
Why Most Kitchen Organization Advice Doesn’t Work
Before I explain what I did, let me point out a common mistake.
Most online advice focuses on:
- Aesthetic setups
- Pinterest-style organization
- Buying multiple storage products
But very rarely do they address:
👉 How you actually move and work inside your kitchen
And that’s the real problem.
Because if your setup doesn’t match your workflow, no amount of organizing will fix it.
Step 1: Observing the “Hidden Time Loss”
I didn’t start by cleaning or buying anything.
Instead, for 2–3 days, I simply observed my own behavior.
This may sound simple, but it’s extremely powerful.
I noticed patterns like:
- Reaching the same drawer multiple times
- Walking between stove and cabinet repeatedly
- Opening 2–3 containers just to find one ingredient
Each of these actions takes only a few seconds.
But combined, they create:
- Frustration
- Time loss
- Mental fatigue
In engineering, we call this micro-inefficiency accumulation.
And that’s exactly what I wanted to eliminate.
Step 2: Decluttering With Purpose (Not Just Cleaning)
Now, instead of just “cleaning,” I evaluated every item based on function.
I asked:
- Do I use this weekly?
- Does this make my work easier?
- Or is it just occupying space?
This helped me identify:
- Duplicate utensils
- Unused gadgets
- Containers without proper lids
One thing I realized here — especially relevant for many of us living in Europe — is that space is limited, so every item must justify its presence.
After decluttering, I didn’t just gain space.
I gained clarity.
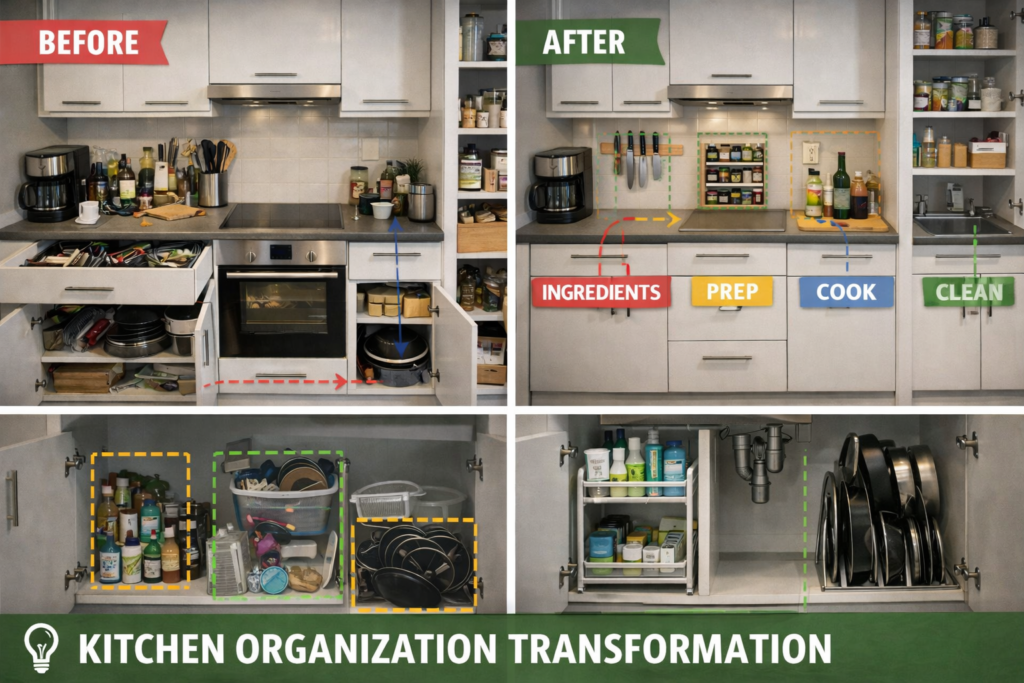
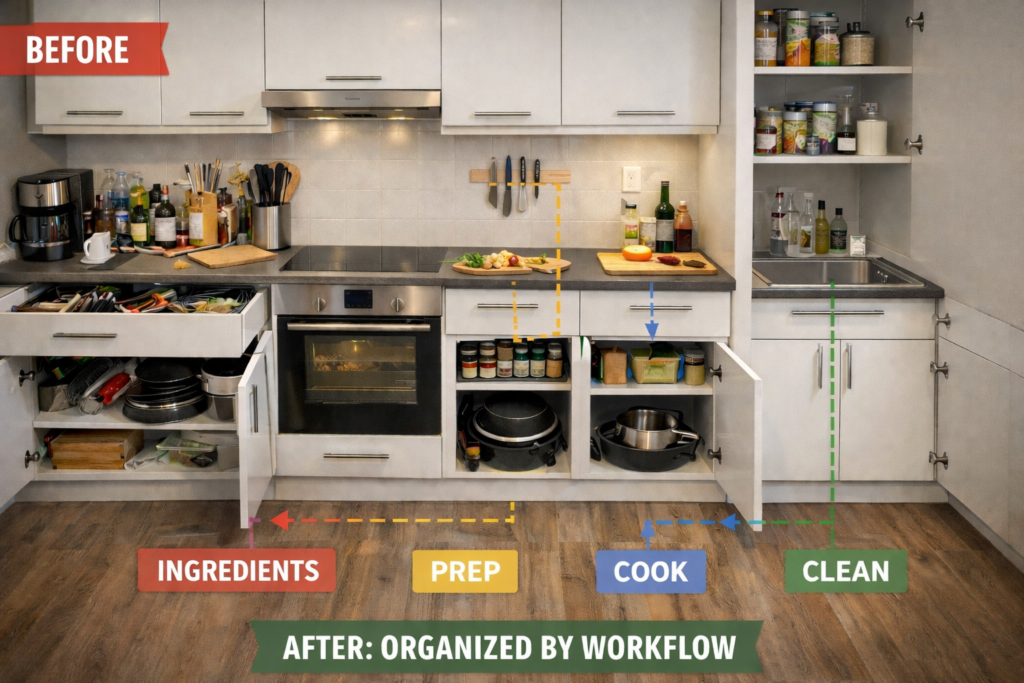
Step 3: Redesigning the Kitchen Based on Workflow
Now comes the most important part.
Instead of organizing by category, I organized based on movement flow.
Let me explain this clearly.
When you cook, your sequence usually looks like this:
- Take ingredients
- Prepare them
- Cook
- Clean
So your kitchen should physically support this sequence.
Cooking Zone Optimization (Where Most Time Is Lost)
Earlier, my spices were inside a cabinet, slightly away from the stove.
This meant:
- Open cabinet
- Search
- Take spice
- Close cabinet
Repeated multiple times.
So I changed this by adding a slim pull-out spice rack next to the stove.
Now:
- Everything is visible instantly
- No searching
- No extra movement
It may sound small, but this one change alone improved cooking flow significantly.
Prep Zone (Where Efficiency Matters Most)
Previously, my knives were inside a drawer.
Every time I needed one:
- Open drawer
- Search
- Take knife
So I replaced that with a magnetic knife strip on the wall.
Now:
- Knives are visible
- Easy to access
- No drawer clutter
Similarly, I grouped cutting boards and mixing tools nearby.
This reduced interruptions during preparation.
Drawer Optimization (A Surprisingly Big Upgrade)
Drawers were messy — not visually, but functionally.
Things were overlapping, which meant I had to search every time.
So I added an expandable drawer organizer.
But here’s the key difference:
I didn’t organize by “type.”
I organized by usage frequency.
For example:
- Daily tools → front section
- Occasional tools → back
This made the drawer feel like a toolkit, not storage.
Cabinet Fix (Biggest Transformation)
Now let’s talk about cabinets — the most underestimated problem.
Earlier, I stacked pans.
This created:
- Noise
- Effort
- Dependency (remove top items first)
So I switched to a vertical pan organizer rack.
Now:
- Each pan is independent
- No rearranging
- Faster access
I also installed a pull-out cabinet shelf, which made deep cabinets actually usable.
Before:
- Items at the back were forgotten
After:
- Everything slides out
- Full visibility
This is where I felt the biggest improvement.
Step 4: Pantry System (Visibility = Control)
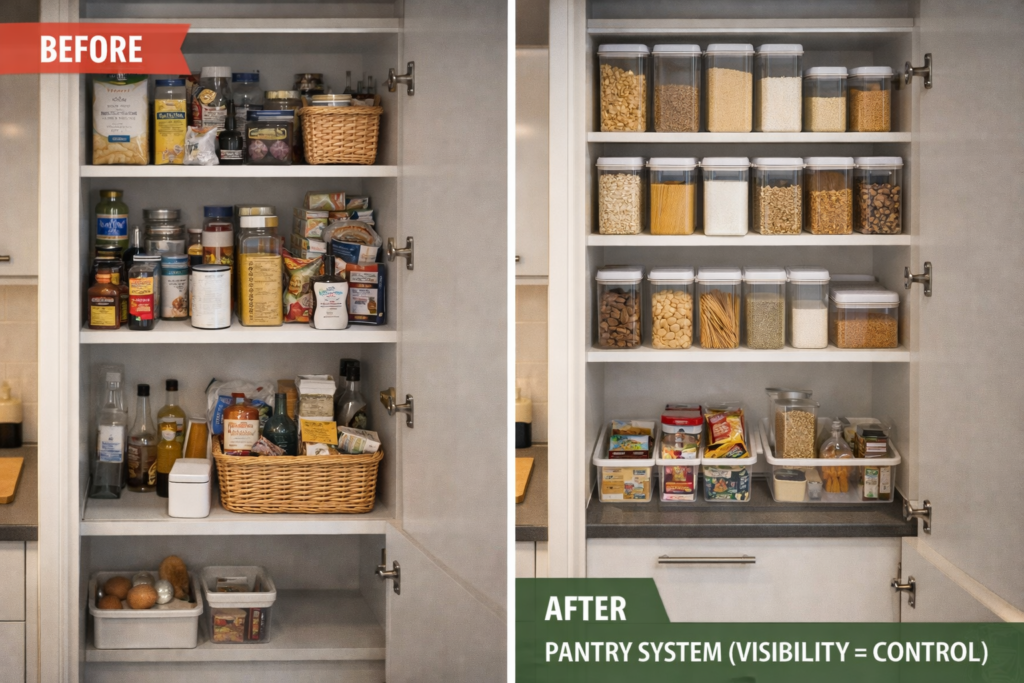
One mistake I used to make frequently was buying duplicates.
Why?
Because I couldn’t see what I already had.
So I moved to clear storage containers.
Now:
- I instantly know stock levels
- No unnecessary purchases
- Cleaner shelves
I also used simple storage bins to group items like:
- Snacks
- Breakfast items
- Cooking essentials
This reduced visual clutter and made everything predictable.
Step 5: Under-Sink Area
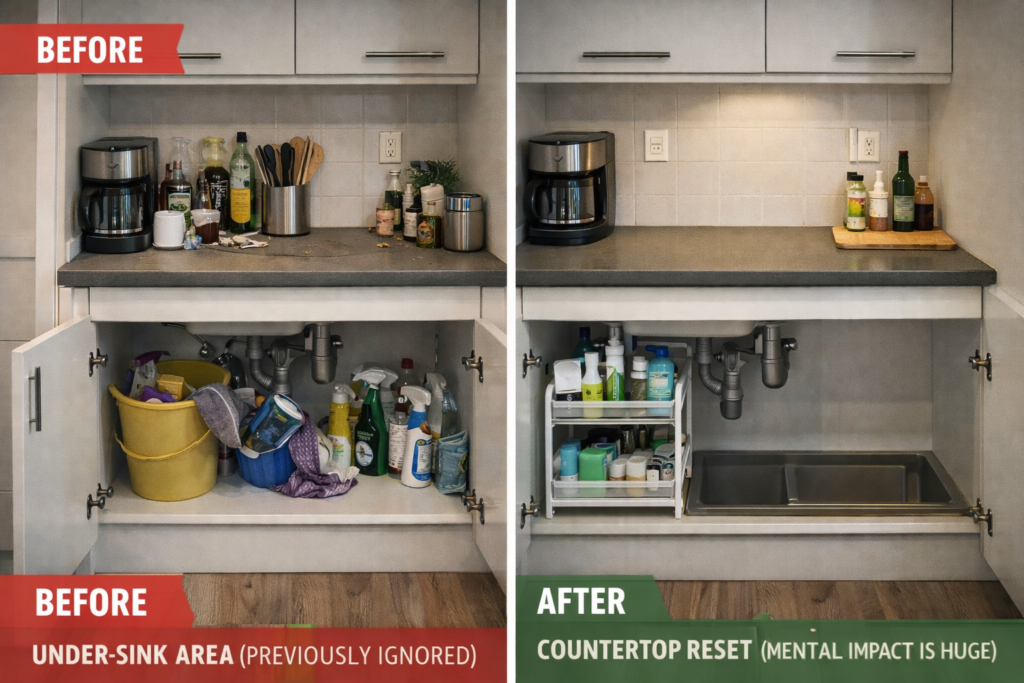
This area used to be chaotic.
Everything was just placed randomly.
So I introduced a two-tier under-sink organizer.
Now:
- Top → daily cleaning items
- Bottom → backups
It’s simple, but it removed daily frustration.
Step 6: Countertop Reset (Mental Impact Is Huge)
I didn’t expect this to matter so much — but it did.
Earlier, I had:
- Extra appliances
- Bottles
- Miscellaneous items
Even though they were useful, they created visual noise.
So I reduced everything to essentials.
And suddenly:
- The kitchen felt bigger
- Cleaner
- More relaxing
This is not just design — it’s psychology.
Step 7: Vertical Space (Critical in Europe)
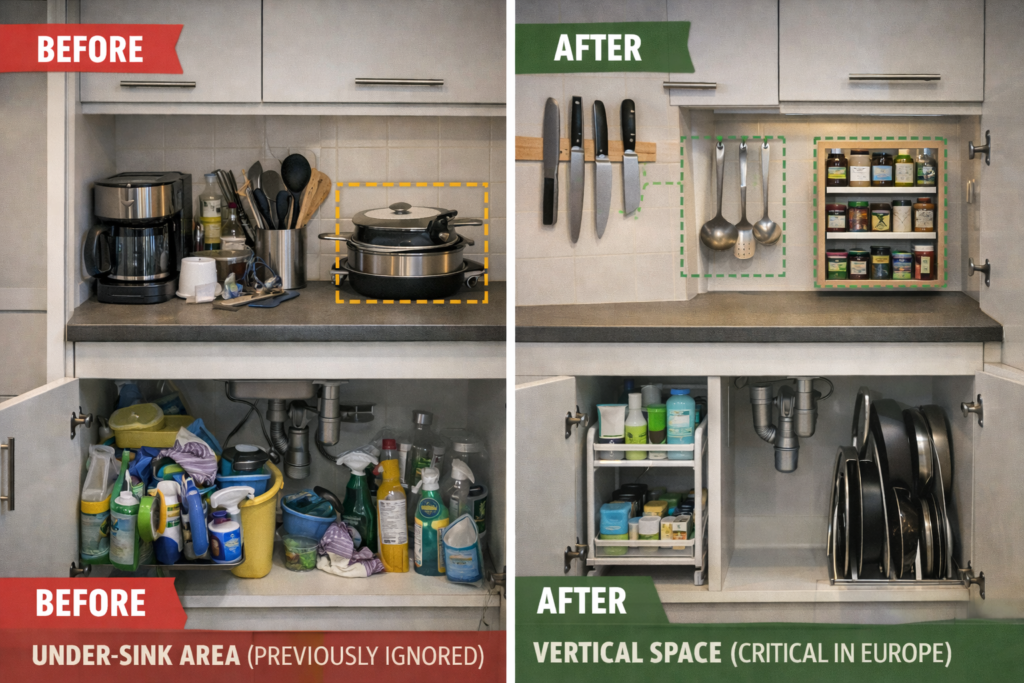
Living in Germany, I realized that vertical space is often underused.
So I added:
- Wall hooks for utensils
- Magnetic knife strip
This freed up both drawers and counters.
In engineering terms, this is:
👉 Increasing capacity without increasing footprint.
Step 8: Fixing Repeated Daily Frustrations
Finally, I focused on small but frequent problems:
- Lid storage
- Drawer clutter
- Access issues
Fixing these created a compounding effect.
Each small improvement reduced friction.
What Actually Changed (Real Impact)
After all these changes, the difference was very noticeable:
- Cooking became smoother
- Cleaning became faster
- I stopped overbuying
- The kitchen felt bigger
But most importantly:
👉 I stopped feeling irritated while cooking.
Final Thought (From Real Experience)
If you take only one thing from this article, let it be this:
Don’t organize your kitchen for appearance.
Organize it for efficiency.
Because once the system works, everything else follows.
Smart Deal Finds — Practical Product Insight
From real usage, the most impactful upgrades were:
- Expandable drawer organizers
- Vertical pan racks
- Pull-out cabinet shelves
- Clear storage containers
- Under-sink organizers
These are not “extra” products — they are functional improvements.
Smart Storage & Organization
- 👉 5 Best Amazon Home Organization Products That Save Space
Discover practical storage solutions that work especially well for small kitchens and apartments. - 👉 4 Space-Saving Floating Shelves That Make Small Homes Look Amazing
Learn how to use vertical space effectively — a key strategy for modern kitchens and compact homes.
Small Space Living (Very Relevant to Kitchen Setup)
- 👉 Small Apartment Living Room Layout Ideas (2026)
Understand how layout and movement flow improve space efficiency — the same principle used in kitchen workflow design. - 👉 How to Design a Small Living Room That Feels Spacious, Stylish & Functional
A practical guide on making compact spaces feel bigger — useful if you’re optimizing a small kitchen.